


Geometric Patchwork Phone Pouch.
Make a clever and versatile phone pouch using fabric scraps in your favourite colours.
Preparation:
1. Measure and not the height (h) and width (w) of the phone in inches (to the nearest ¼”).
2. Cut a rectangle of fabric from each of the coloured fabrics. The size of each rectangle should be (twice the measured width) by the (width plus ½) i.e wide by w + ½ “ high.
3. From background fabric cut a rectangle the same width as before (2w) but 1” higher (w + 1 1/2 “) .
4. Measure 1” up from the bottom of one of the short sides and cut diagonally across from this to the opposite top corner. Set aside the larger piece for the flap triangle. Discard the smaller piece. See Image:
Click image to enlarge.

5. Cut a further rectangle of background fabric the same width as before (2w) by 1 ¼ “ high. Set aside for the binding strip.


1.
1. Taking each of the coloured rectangles in turn, cut across their diagonal to create 2 right-angled triangles.
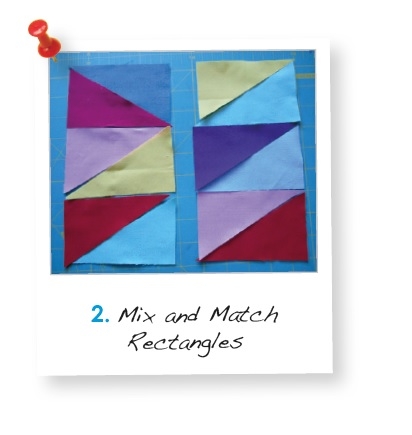
2. Select 12 triangles and rearrange them to form 3, bicoloured rectangles (photo) (if using more than 6 fabrics discard any extra triangles or use another pouch)
3. Stitch the triangles back together to make rectangles, pressing all seams towards the darker fabric.
2.

4. With their long edges touching, arrange the rectangles in a pleasing vertical layout. Stitch together to make a strip. Decide which end will be the front.
5. Take the flap triangle and attach to the front end (photo 3). Trim the excess fabric from the side to the flap.
3.

6. Decorate your patchwork strip (optional):
- Using the completed piece as a template cut a piece of iron-on stabiliser large enough to back the whole piece and attach the following instructions.
- Work decorative lines of stitching on some or all of the triangles (photo)
4.
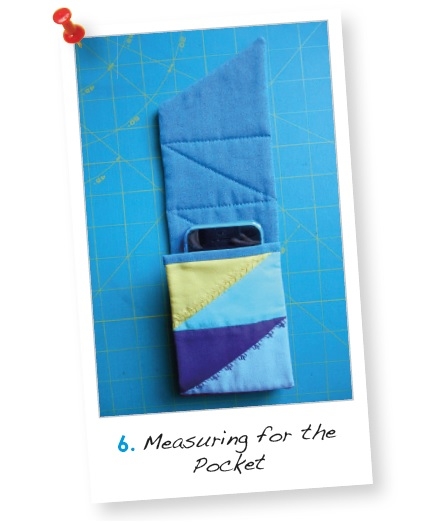
7. Centre the design and trim the width of the patchwork top so that it is the same as the phone’s width (W) plus ½ “
- Use the patchwork top as a pattern to cut a piece of wadding and backing of exactly the same size and shape.
8. Make a sandwich as follows: wadding, top (right side facing upwards), backing (wrong side upwards). Pin or baste to hold the layers together.
5.
9. Using an Even Feed foot to prevent slippage and leaving the short straight edge open, stitch around the edge of the sandwich. Reinforce each end of the stitching by backstitching.
10. Carefully trim excess wadding and fabric from the corners and turn the piece right sides out. Ease out the edges and press.
6.
11. Bind the open edge using the rectangle of fabric set aside previously.
12. Using an invisible thread or toning threads, quilt in the ditch along the main seam lines to stabilise the phone pouch strip. Work as a continuous zig zag down the length of the strip.
7.
13. Fold completed strip around the phone and mark where the pocket will be. (Photo)
14. Slip stitch or ladder stitch edges closed by hand using a double thread for strength.
8.

15. Optionally, mark and make a buttonhole in the triangle section of the flap and sew on a contrasting button.
16. Place the phone in its pocket and admire!
9.
This project was created on the Janome Atelier 5 Sewing Machine using the following stitches:
Mode 1 – Straight Stitch 01 and Buttonhole 25
Mode 2 – Decorative Stitches 07, 11, 33 and 45
Click here for pdf files:
• Cotton fabric for background (approx. 5" x 24") *
• Quilters cotton wadding (approx. 5" x 20") *
• Lightweight iron on stabilizer (approx. 5" x 20") *
• Neutral and blue sewing threads plus a selection of embroidery threads (optional)
• Contrasting button
• * - generous amount, the exact amount will be dependant upon the size of the phone